Say that 5 times fast.
The nursery in the DIY Blogger House was inspired by this fabric
by Patty Young. (She is DELIGHTFUL. I took a class from her last year at The Creative Connection and it was for sure one of the highlights of my trip.) It’s Moorish Tile in white from her Andalucia collection for Michael Miller.
I picked up a bunch of awesome fabrics from Fabric.com. (I’m not affiliated with them in anyway, just letting you know where I got my stuff.) They have an awesome feature on their site where you can add fabrics to an inspiration board to see them all together before you make your purchase. I built on the colors in the Moorish Tile fabric and came up with this:
I didn’t end up using all of the fabrics on the board, but it was my online version of stacking a million bolts in my cart before I make a final decision at my local fabric store. ![]()
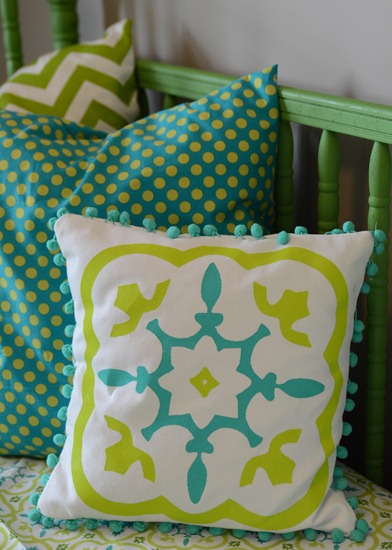
I made pillows out of the Michael Miller Ta Dot Lagoon and the Premier Prints Zig Zag Chartreuse, but I wanted something unique for the other pillow. I decided to enlarge part of the design in the Moorish Tile pattern and paint a pillow.
Because I’m not that coordinated, I cut a freezer paper stencil.
Because I’m lazy, I used my CAMEO.
I showed you last week how to trace a design using your Silhouette. That’s where I started. I traced the image of the fabric, but then I had to make a couple of modifications. My trace of the design looked like this:
That’s absolutely fine, but I wanted it cleaner and with less stuff around the edges. I wanted to focus on the center part. So, I made the trace bigger (click and drag on the corner) and rotated it the direction I wanted it to be (the green dot at the top of the design allows you to rotate). Then I right clicked and selected “Release Compound Path”.
This makes the image a bunch of separate cuts and lets you delete the floater pieces that you don’t want. I deleted all the floaters and was left with this:
Getting closer! I opened my Eraser menu after that (over on the left, under the add text button) and erased the parts of the design that I didn’t want.
At this point I would recommend selecting the entire design and right clicking and then selecting “Group”. This way your whole image sticks together and stays the same size.
Now I just needed to fill in the missing pieces. I used the “Draw Freehand” option to do that. It’s right above the add text button. You can see it highlighted in the image above, but it’s tiny.
Draw in one of the missing lines. It doesn’t have to be great. Mine started out like this:
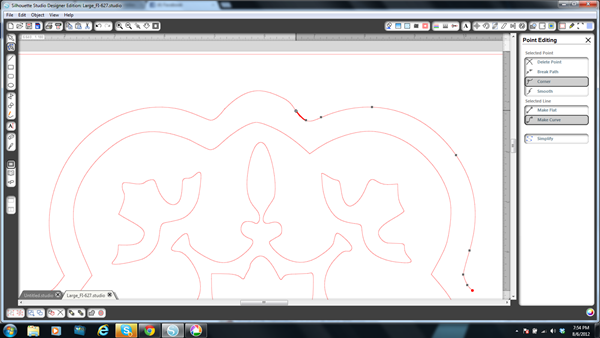
If you double click on the line you just drew, it will bring up the point editing menu.
It will allow you to maneuver the end points of the line you drew over onto the lines in the design as well as modify the curves. Just play with it a little! And, if you screw up, use the undo function and try again. Once you’ve got it how you like it, select the whole design and right click and select “Group” again.
Repeat for the other 3 sides.
Nice, right? I had a 14” pillow form, so I wanted this design as close to 12 X 12 as possible. I stretched it all the way to the edges of the cut area.
To cut freezer paper with your Silhouette, put the shiny side up and reverse your image (if necessary…it wasn’t really necessary on this). Choose the normal paper settings and then slow it down just a little.
I ironed the design to some white cotton duck that I had on hand and then filled it in with craft paint mixed with a textile medium (so it doesn’t get crispy or crack). The paint colors I used were Granny Smith from Martha Stewart Crafts and Ocean Breeze from Craft Smart. They were picked strictly for how well they matched the Moorish Tile.
And the finishing touch? Some pom pom trim from our friends over at Pick Your Plum.
I kind of love it.
I bought the 2 bottles of craft paint for this project and our designer Brian provided me with the pillow form ($1.99 from IKEA) but I had everything else on hand. I think this is a great inexpensive way to add a custom one-of-a-kind pillow to your space.








This is exactly what I needed! Thank you! Quick question:,are parchment and freezer paper the same type of paper? I have parchment but not freezer in the pantry. I love your choice of color and fabric. Beautiful!
I’m new to crafting so I truly appreciate when you mention a store or product. It’s VERY helpful!
Parchment paper is not the same as freezer paper. Freezer paper has a waxy side that melts just a little to adhere to fabric.
Yup…still love this pillow! I just need to get me a cameo and I’ll be set!!
Hey, Char! Love your projects! Could you tell me what brand of freezer paper you use? I bought some and tried to cut it with my Cameo but it just gets torn to shreds! I’ve been using adhesive vinyl for my stenciling, but it’s getting really expensive (my daughter has discovered creating t-shirts with the Cameo is SUPER fun!), so I’d love to get the freezer paper to work!
Thanks for all the inspiration!
I use Reynolds. The secret is to make sure and cut your designs backwards (shiny side up) and slow down the cut speed. Another option you might try is contact paper. It’s got a bit of a learning curve because it’s trickier to cut than vinyl, but I’ve used it before with success as well.
Love that pillow! The pom poms are the perfect touch.
Oh, that is so cute! I love that fabric I just recently used it on a project of mine too!
What’s up Dear, are you in fact visiting this web page regularly,
if so afterward you will absolutely obtain good experience.