


So You Want To Be A Slurpee…

***Enter The Pleated Poppy giveaway here. It closes tonight!***

You’d better take a sedative, because that’s the only way anyone should ever commit to replicating these costumes.

DSC_0783

Here are a few of the specifics, if you’re interested:

The “cup” is cloth automotive headliner fabric (like for the interior roof of your car). I picked it up locally at Hancock Fabrics and then I started to paint.

And paint.

And paint.

It took over a gallon of white latex paint, just to get a basecoat.

And then I did a 2nd coat (took MUCH less).

I taped off each “cup” into sixths.

I found a Slurpee font and downloaded it. Then I used my Silhouette to cut the lettering out of freezer paper. (Tip: When cutting freezer paper with a Silhouette, use the green/cardstock mat, put the dull side down, and cut your design backwards.) The freezer paper only stuck marginally to the painted surface. I had to paint carefully, but it worked out OK.

The red lettering is acrylic craft paint. The blue is latex pain.

I hot glued a “casing” along the top edge. I used sprinkler funny pipe for the frame.

The straws are red pool noodles.

The beverage portion is tulle. There’s also a coordinating colored “collar” hot glued and Gorilla taped inside the rim of the cup. It has an elastic casing to slip over the head.

Please follow and like us:

Happy Ho-ho-ho-lloween?

***Don’t forget to enter The Pleated Poppy giveaway here.***

Campbell doesn’t really like costumes.

Heck, he doesn’t even like clothes (basketball shorts excluded…it’s that Asperger’s/SPD thing).

Halloweens in the past have involved him screaming and freaking out because he HATES whatever he’s wearing. I think he could be dipped in battery acid and it’d cause less commotion.

So, when he actually came up with a costume idea that he was excited about, I ran with it. Even if the requested costume WAS Santa.

DSC_0762

I traced a pair of pajamas for the pants and then cropped them and added fur.

DSC_0742

I traced one of his older brother’s church shirts for the jacket, and then added fur.

The belt is a dollar store picture frame spray painted gold. Then I hot glued the end of the belt vinyl to the picture frame back and slid it into the frame and glued that in place, too. It closes with velcro.

And, for the very first time ever?

DSC_0750

I have a kid who’s happy on Halloween!

Please follow and like us:

If at first you don’t succeed,

***Don’t forget to enter The Pleated Poppy giveaway here.***

DSC_0674

try, try, try, try again.

Those are all Buddy the Elf hat rejects. The first one was so bad that I threw the whole hot glue-y mess in the garbage.

It turns out that trying to get a hat band to conform to the shape of a very slanty elf hat is harder than I anticipated.

Ribbon (on the right) was cute, but I didn’t like the little creases and bubbles.

A c-shaped piece of fabric (on the left) laid down nicely, but it was boring.

I got desperate and started thinking about no band at all (center).

And then I thought of my old friend “bias tape”. And we had a winner!

DSC_0683

DSC_0685

To make the elf hat, I traced one of my big silver mixing bowls (about 13.5″ in diameter) and then cut the circle in half. Next, I added my banding. I did a combination of sewing/gluing. Once that banding was in place, I folded the hat in half and seamed the straight edge.

Then, I folded the bottom edge under about 1/4” and hot glued it in place. I didn’t want any stitching visible. Add a red feather and you’re done!

Please follow and like us:

The Claire Witch Project*

Did you see the super cute witch hat applique pattern over on UCreate last week?

I did.

DSC_0254

And my niece Claire is rocking it. (Tangent: I swear she suddenly has WAY more hair than when I saw her 3 weeks ago.) She also has ruffles on the bum. The skirt is just a bunch of strips sewed side to side with a little waistband and then I hemmed it with bias tape.

Has anybody else tried the applique pattern? What other Halloween wear have you made?

*Totally ripped off the title from an email my SIL sent me.

And I’m adding another pic of the ruffles because they KILL me!

DSC_0282

Please follow and like us:

Quilted Table Runner

Well hello there, internet.

What’s new?

Not much here. Remind me next time not to have quite so many kids. Or at least forbid them from signing up for anything.

Soccer and football are consuming us.

Sometimes at the end of the day, we’re so tired we can’t even poop.

DSC_0880

At least he didn’t fall off and crack his head open this time?

I have found time to squeeze in a little sewing. I meant to get to this last month, for Create With Me over on UCreate.

DSC_0906

Amy’s tutorial is fabulous. And she’s WAY nice…didn’t even put me in her spam folder when I told her I want to come sew with her.

DSC_0909

I made mine all triangley instead of using strips. I’ll post exactly how I did that in the next day or two.

DSC_0911

Guess where else it looks fabulous?

DSC_0904

On top of this beauty.

DSC_0898

I can’t decide where I like it more.

I might need to make another one.

Please follow and like us:

Wrap dress

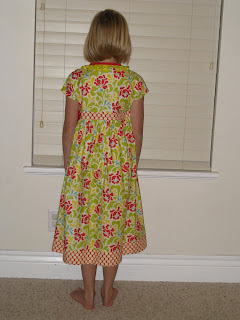
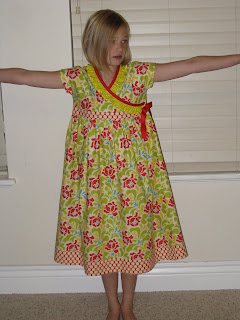
I used this ebook from YouCanMakeThis. Fabric is Heather Bailey Pop Garden and Bijoux and Amy Butler Lotus. The pattern was SUPER easy and fast- 2 pattern pieces and everything else is rectangles. As long as you can gather, you can make this dress. And yes, I know my kid is a dork. I made the size 8/10. There’s plenty of room (see last pic). I would for sure recommend this ebook. I like that it can be a shirt or a dress and that it comes in sizes 1-10.


Please follow and like us:

The details

You know…in case any of you ever get crazy enough to want to make these same costumes.

Macy’s “cute” vampire:

  • Black shirt and leggings she already owned
  • Sparkly red shoes – reused from last year’s Dorothy costume, originally purchased at Target.
  • Tutu – used this tutorial
  • Cape from Simplicity # 5927 – The pattern called for 13.25 yards of trim. There were also supposed to be horizontal lines of sequins and some on the collar, but there was no way that was happening with the 13.25 yards. FabriTac worked way better than the hot glue gun for attaching the sequins.
  • Long black wig – found at the grocery store
  • Creepy make up from a kit and cheap vampire teeth

Keller and Campbell’s Mario Brothers:

  • Overalls from McCall’s #4644 – I lengthened the back straps and squared off the front bib part. I also added facings (the pattern is made for fleece) and the chest pocket.
  • White magic stretch gloves – I bought mine on Amazon.
  • Long sleeve tees in bright red and green – I bought mine from www.cheapestees.com
  • Baseball caps from Oriental Trading – I had to buy a dozen. If anyone needs a freaking ugly hat in red, green, yellow, orange, black or blue…let me know! I free handed the M and L circle logos and then used Wonder Under to make them. I used FabriTac to glue them to the hats.
  • Mustaches – also from Oriental Trading
  • Wigs – found at Dollar Tree, they were originally red and yellow striped. I spray painted them black.

Bennett’s Toad:

  • Toad hat – modified from this idea in Family Fun. It’s basically a sombrero and bubble wrap. I glued on the red circles with more of the FabriTac. That stuff got a work out this year.
  • Vest – made from red felt with yellow felt trim. I looked at a pirate vest from several years ago and figured out how to shape the pieces from that. It took 3 tries, but felt is cheap and wide, so I had plenty.
  • Pants – white knit. I traced a pair he already owned and made them puffier and put elastic at the bottom.
  • Shirt – I used a long sleeved onesie I already had and dyed it. I used Rit Liquid in tan and just dipped it ’til it looked to be a good skin color.
  • Brown shoes – we already owned, but they’re Pedipeds if you think you need some.
Please follow and like us:

Sewing machine cover

I used these directions. Fabric is a curtain panel from Ikea and leftovers from my ironing board cover. It fits both my crappy old Singer machine and my Babylock, so it’d probably fit most others as well. Now I think I need one for my serger. And I’m pretty sure I need to paint my stools and chair red. This organizing thing is getting out of control.

Please follow and like us:

The Jenny Bag and the winners

I made this bag for a friend. She picked the fabrics. I think they’re Alexander Henry, but I bought them a very long time ago for a dress for Macy so I’m not quite sure.


The inside:

Tutorial and pattern here. It’s a little small (keep in mind I pack around a diaper bag called “MotherShip” for day to day use and take my opinion on that with a grain of salt). I also didn’t like how the straps were attached last. It’s a little sloppy for my liking. If I made it again, I’d attach them when I sewed the lining to the outer fabric.

Just for fun, a picture of Macy in the dress. 2 years is a long time in kid years.

The winners are….

Ambrosia (totally typed your actual name the first time), who guessed correctly when she said “Did you find it tangled around the rotating brush rod on your vacuum cleaner after it stopped sucking stuff up/rotating while you vacuumed your latest craft mess?” Indeed I did.

and

Jane, who said “BC’s belly button?”. However, I’m not flying to Phoenix to make her dinner. Sorry, Janer.

Pretty sure you both already have my email, so let me know what you want for your prizes!

Please follow and like us:

SO much better

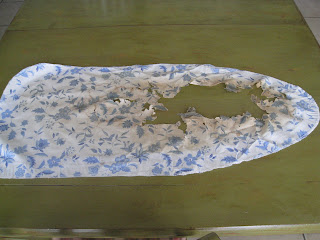
This was my ironing board cover this morning:

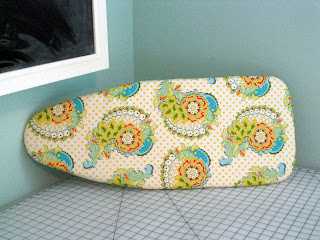
This is my ironing board now:

Tutorials can be found here, here, and here. I did a wide 3 thread stitch on my serger and then threaded the string from the old cover through the stitching with a doll maker’s needle. I also added 2 thin layers of cotton batting. Fabric is Heather Bailey’s Pop Garden.

And, the contest is over at midnight. Stay tuned for winners in the morning!

Please follow and like us:

Creative Commons License
Crap I've Made by Char is licensed under a Creative Commons Attribution-Noncommercial-Share Alike 3.0 United States License.
Based on a work at www.crapivemade.blogspot.com.
Permissions beyond the scope of this license may be available at www.crapivemade.blogspot.com.

MyFreeCopyright.com Registered & Protected
BLOG DESIGN BY: