Thankful tree

My BFF Sheri does this and I love it! She hangs hers on a door, but I wanted it in the family room. Our family room is mostly windows…the lone solid wall has the piano on it. So, I put it in the corner.

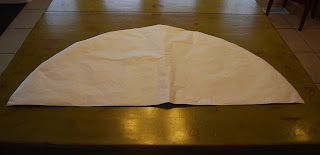
I got about 4 feet of brown craft paper and creased it down the center. If yours isn’t going in the corner, you won’t need to crease it.

I sketched a tree trunk shape. If you actually took and passed art in high school, yours will look better than mine. Thank heavens for pottery and social dance!

I cut the trunk out and taped it to the wall using blue painter’s tape. I’m sure there are better ways to do it, but I was working with what I had.

Then, I sent Keller out in the backyard to find a big old maple leaf. I made a template and cut 40 or 50 leaves out of different fall colors of construction paper. You could use cardstock or whatever. You could also find someone that has a die cut machine. Cutting 5 at a time made it go pretty quickly, though. You can find my template here. If I were doing it again, I’d make the leaf a little smaller, so I could fit two to a page.

Tonight, we sat down and talked about all the things we’re thankful for and each chose 2 to write on leaves. Campbell said Blake (my brother) and Santa. That’s the chance you take when there’s a 3 year old in the mix.

We taped the leaves on the tree.

There’s a bowl of leaves on the mantle so we can add to it as the month goes on.

The plan is to read them all on Thanksgiving to help us remember how blessed we really are.

Posted by Picasa
Please follow and like us:

Perhaps it’s just this time of year?

Remember this from last year?
We had a repeat this morning, though candy was not directly involved.
Posted by Picasa
Please follow and like us:

Giveaway! Germ Free 24!

***CONTEST IS NOW CLOSED***

A couple weeks back I was given a bottle of Germ Free 24 to try. I’ve been hosing my kids down with it every morning before school, and so far so good. We’ve had a nasty H1N1 outbreak in the neighborhood and we’re still unscathed. Maybe we’re just lucky? Dunno, but I’m going to keep using it.

Also, it smells like something I used to use on my perm in the 80′s, but I’m not sure what. Ah, memories.

I’m not making you jump through any hoops, follow anything, tell me a joke, share an embarassing moment…ALL YOU HAVE TO DO IS LEAVE A COMMENT ON THIS POST. How easy is that?

I have 3 2oz bottles to give away. Contest ends Friday, November 6th at 8:00 MST.

If you want to buy some, go here.

On your mark! Get set! Comment!

Please follow and like us:

From precious to dead

See this?
It’s the Precious Dress pattern/ebook by the VERY talented Carla. I believe I’ve rambled on in the past about how much I love her lounge pants (seriously easy…Macy made her own pair a couple weeks back). I took that insanely easy and fabulous dress pattern and turned it into this:

I made the waist length dress bodice with sleeves and without the collar.
Tangent: That’s what I loved about this pattern…make it empire waist or regular, add sleeves or don’t, add a collar or don’t. Want an apron? Great! Add one! I really want to make this again for reals, not for Halloweens. If you want the pattern for yourself get it here or here.
I used cheap-o Hobby Lobby costume satin ($3/yard and it’s 60″ wide!) because it is, after all, just Halloween. Once I had the bodice done, I added a peplum (or is it peplums? I’m not really up on my sewing terminology).
I got out my freezer paper and drew a half circle with a radius of 18″. I just hooked a pencil to a string…super fancy! Why 18″? That’s how wide my freezer paper was. Ha!
I cut out 2 for each dress.
Then, I hemmed the straight edge (which measured 36″) with a narrow hem.
I ran a long basting stitch on the rounded edge (which measured 56.52″…KIDDING! I didn’t actually measure it!) and then pulled my bobbin thread to gather it.
I pinned 1 to each half of the bodice and evenly distributed the gathers. Head back over to Carla’s blog for pictures. She uses a rectangle shape, but it’s the same concept.
I had the girls make tutus out of 2″ strips of white tulle knotted around elastic headbands.
There’s a simple skirt just made out of a tube with an elastic waist under the tutu for “coverage”.
We also added a wide sash at the waist. They’re about 8″ wide and 100″ long. We tied a big bow in the back.
Then, the girls rubbed charcoal briquettes all over their hands and smeared ‘em all over the dresses. This was a good thing, because up until the smearing the costumes were a little too Madonna singing “Like a Virgin” at the VMA awards for 9 year old girls to wear in public.
The spiders are hot glued to the high tops and should be removable.
The chokers are just a piece of ribbon with the skeleton stitched on and a spider ring (with the back cut off) hot glued on either side.
The earrings are cockroaches with an earring hook hot glued to the back.
The veils are about 36″ of tulle gathered on the center fold and then hot glued to a comb. We also glued a spider to the bottom/back layer. You can see Macy’s on the right if you look closely.
The bouquets are dollar store flowers with a little bit of black spray paint.
Even though I don’t “get” the whole dead bride thing, these were really fun costumes to make!
Posted by Picasa
Please follow and like us:

Pattern Review: Simplicity 3997

View A, Army outfits. Uniforms?

Way easy and not at all confusing, as patterns can sometimes tend to be.

There are no yardages listed for 60″ wide fabric (aka all the camo we could find). I had enough left over from the size 8 and the size 5 to make the size 3.

About that size 3…the pocket placement for the bottom pockets is too low for you to hem the bottom edge as directed. You’ll need to either move them up or make a smaller/different hem.

We decided against the hat/beret thing because my kids have VERY large heads. I wrapped the band piece around Keller’s head before sewing and it barely touched. There’s no way that puppy was going to work. Army Navy Surplus hooked us up with the ball cap and bandana (Bennett CANNOT handle things on his head) and the dog tags and face paint.

However, if you’re ever in the market for camo face paint, DO NOT buy it there. That stuff is authentic. It took much scrubbing with soap (like half an hour) to get it all off. All 3 boys were screaming and red faced. I’m still trying to come up with an alternative for Saturday night.

And Macy’s already laid dibs on Keller’s coat. She wants to wear it to school on Monday.

Posted by Picasa
Please follow and like us:

Pattern Review: McCall’s 4948

A neighbor called and asked if I’d maker her an Alice in Wonderland costume. She’d looked online and most of them were, uh, a *little* on the trashy side. OK, most of them were A LOT on the trashy side. I did a little searching and found this pattern.


It comes in both kids’ and women’s sizes. It was quite simple and a quick and easy sew. The only thing I did not enjoy (and I’m guessing it’s the same on the Dorothy version) is that the “bib” portion of the apron is hooked to the dress and is not actually part of the apron. If I were to make it again, I’d leave the dress plain and find an apron pattern somewhere else or make something up. I also thought it was weird (and expensive) to use ribbon folded in half for the apron tie instead of fabric.

Posted by Picasa
Please follow and like us:

Why it takes twice as long as it should

for Macy to practice piano:

I think it’s worth the extra time, don’t you?

I’m out from under the mountain of Halloween. More on that in the next couple of days, plus a giveaway.

Posted by Picasa
Please follow and like us:

Readers Rule!

One of my readers, Tiffany, emailed me a while back. She was making some tie onesies for a friend having quads (!!!!) — 3 boys and one girl. She asked if I had any ideas for the girl onesie. I failed miserably, but look what she came up with on her own!

How cute is that necklace??? Good thing I have a cute new (though still nameless as far as I know) niece to make one for!

Posted by Picasa
Please follow and like us:

My apologies to Krylon

I saw these on a blog (the name of which I cannot remember for the life of me) a while back and fell madly in love. I saved the picture for inspiration and left a comment asking where they came from. I went back every day for weeks….nothin’.

I Googled every name for that color I could think of. Still nothin’.
I searched locally at every store I could think of. I found a matching frying pan at HomeGoods, but still no canisters.
Until today.
I was at Hobby Lobby and turned down a wrong aisle. I found some off white canisters on clearance. And then I took some spray paint to them.
And they are PERFECT! (And a much nicer color in real life….I loaned out our good camera so this is what you get.)
I used Krylon and it was great. I rescind everything I said in this post.
And BC’s in Cincinnati again. Apparently him being out of town makes me spray paint things. Weird.
Posted by Picasa
Please follow and like us:

Like ice cream?

Need trick or treat buckets?

Have I got an idea for you!

Check out this tutorial from my friend over at brown paper packages.

Posted by Picasa
Please follow and like us:

Creative Commons License
Crap I've Made by Char is licensed under a Creative Commons Attribution-Noncommercial-Share Alike 3.0 United States License.
Based on a work at www.crapivemade.blogspot.com.
Permissions beyond the scope of this license may be available at www.crapivemade.blogspot.com.

MyFreeCopyright.com Registered & Protected
BLOG DESIGN BY: