


Weighted Blanket Instructions: These instructions are for a 40 x 64 inch blanket. You can adjust the size as you desire by following the basic instructions. Supplies: Fabric: (Cotton is best due to breathability) You need 2 yrds of a top fabric, 2 yrds of a bottom fabric, and 4 yrds of interior fabric, cut into 2 yrd increments (for this I used a white cotton poly) - there will be a little extra. . . Thread (I used 2 spools) Imagine what the inside of the blanket looks like: You know what an excel sheet looks like, rows and columns? That is what the inside of the blanket will look like when you are done. Weight: The weight of the blanket is determined by the weight of the person whom it is intended. The total weight of the blanket should be approximately 10% of the person’s body weight plus 1 lb. This pattern is intended for a blanket weighing approximately 6 lbs, BUT CAN BE ADJUSTED. You may need to adjust certain dimensions in order to add more weight. This pattern will work for any lighter blanket. Pockets, Pockets, Pockets The blanket I made has 1×4” pockets, however they would not have room for more than a tsp of weight in each pocket. You may want to experiment a bit to figure out how many pockets you will have based on how much weight you need. The instructions from this point will be using 1×4” pockets, just know, you can adjust and just use the general idea of the pattern as needed. Instructions (finally): 1. Take the poster board and start marking with marker, measure in 4” from the edge (width) and 1” for the edge (length) mark dots 1” apart for the length of the board. When the 1st column is done, measure 4” over, and mark the length of the board again. When you are done you should have organized ‘dots’ covering the poster board. Now, poke holes where the dots are. (I used a pencil. A hole punch would probably work betterJ ) 2. Place ‘wrong sides’ together. (Remember these are interior, and will not be seen). 3. Place the poster board on the fabric both facing lengthwise, and mark the fabric through the holes on the poster board, until you have 64 ‘pockets’ going the length of the fabric, and 10 ‘pockets’ going the width of the fabric. (keep in mind you will have extra fabric at the top, bottom and sides of the blanket. You should measure the fabrics to center the “dots” the dots will end up with the approximate dimensions of the blanket (40×64”) 4. Following one column of dots on the right side of the blanket, sew up the length of the blanket. DO NOT sew more than one set of dots!!! 5. Following the rows of dots, sew up each row – the width of the fabric. You will end up with 64 pockets measuring 1×10”. 6. Tape your funnel to your rubber tubing. As much as possible make it so they are even with each other, so pellets cannot get stuck. 7. Attach a threaded needle to the bottom of each column. 8. Push the rubber tubing all the way into the 1st row, place the measured beads into the tube, making certain to shake them completely into the bottom of the pocket (can take a bit). Move the tubing out of the way just enough to hand sew up, one inch. Fill the next pocket with pellets, and sew up one inch. Repeat with remaining 63 rows. 9. Once all pockets are filled, place top fabric on top of the interior fabrics, and pin at the hand-sewn seams. Make certain to pull everything as tight as possible, in order to not have puckers and bumps. 10. Using a sewing machine, sew the top fabric to the interior fabrics. (hint: visually follow the seams on the interior fabric.) (Second hint: If you pick up the pellet pockets at the seam you are going to sew and shake them down, they will stay out of the way better than if you try to sew with them where they are. The machine will not like you if the beads get in the way!!!) 11. Attach the back fabric, by pulling tight, and pinning at the edges of the blanket. Outer seams are all that are needed, which will cause less sensory difficulties for children. Sew the backing to the blanket. 12. Finish the edges as you would prefer, in normal quilting fashion. (turn rough edges in and sew, etc) 13. Congrats on your new weighted blanket! ** It is suggested by some professional weighted blanket companies that additional batting should NOT be used in weighted blankets. The idea is the beads destroy the batting, and the batting causes the blanket to be too hot during certain times of the year. If you choose to add batting it should be done as a 3rd layer of fabric, in between either the top or the bottom layer of the blanket, outside of the pellets. This will help the batting to stay in an optimal condition. If you choose to have batting you will need to tie the quilt at least every 4” which would cut out step 10, as machine sewing will be nearly impossible. This will cause the blanket to be VERY, VERY warm, and I do not suggest it.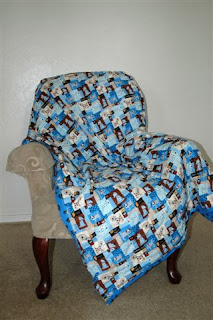
9 hand needles
45” ¾ inch rubber tubing (you can purchase at Home Depot for cheap)
Funnel (We twisted a cereal box and made our own)
Plastic doll pellets (I purchased from www.crscraft.com, however, many professional companies will only use poly pellets, which will withstand more heat than the pellets I purchased. Both are machine washable and dryable; however the pellets I purchased can only be dried on low, while the poly pellets can withstand more heat.) ***Note from Char: Poly pellets are available from www.craftpellets.com***
Poster Board and marker
Weighted Blanket Tutorial
January 14, 2010 By 35 Comments
A (blog-less) friend of mine has a son with Autism. She created this tutorial and wants it shared with everyone who might be similarly in need. She writes:
A weighted blanket is often used by children and adults with autism and other sensory-related disorders; including
restless-leg syndrome. It helps a person to relax and to find comfort in a similar way deep pressure works. Serotonin is released through the pressure – which converts to melatonin
which helps our bodies to relax.
There are several patterns online, but as I searched the internet for a pattern I could use
I discovered many of them were designed using a weighting material that could not be washed. As I continued my research, I discovered in the rest of the patterns, the weight would not be evenly distributed,
but would instead, move significantly within the pockets. These were concerns to me. I decided to design my sons blanket myself, being certain to do so in a way that would allow for a more evenly distributed weight as well as be machine
washable.


Wow, if only I had the patience to make that. One of my kids is VERY sensory; we've found a decnt substitute for a weighted blanket for now… but this tutorial is going to make a lot of moms very happy! Thanks for sharing!!!
thank you for posting this. My daughter has autism and i need to make her one of these but could not find a patten. thanks for posting
Thanks for the detailed tutorial! My sister teaches children with autism, and is a ABA therapist. I know she will love to be able to pass this along to her clients!
we've looked into these or a weighted vest, too. tell her thank you!
Please thank your friend! Finding a tutorial like this is near impossiable. My son has sensory issues and this tutorial is going to be a life saver! Thank you!!
Thank you for the tutorial! I have a son with severe autism and this he would love! I made him a quilt for his bed for Christmas, but I think I am going to try this one as well! Thank you!
Very cool tutorial! I'm going to find out if my nephew with sensory issues would benefit from something like this!
Thanks for the intructions!
I should have known why my son loves his daddy's old, heavy (ugly) blanket way more than the light weight (cute) blanket that I made for him. Thank goodness for OT!
I find myself tearing up as I read the comments. There are way too many of us who are thankful for this post. My daughter is mildly Autistic and I've been wondering for a while now if she'd like a weighted blanket or vest. I WILL be making her one of these. Thank you for posting it.
I think I'd like to repost this on my blog as well, if that is ok with you and your friend.
http://www.abbythegentlegiant.blogspot.com
This is amazing. Please thank your friend and let her know that her hard work is much appreciated. Excited to make one for my daughter.
I've got a sensory kiddo and have been needing to make one of these!
Thanks for sharing it!
Blessings,
LMM
Thank you! I am a SPED teacher and feel strongly about assisting people with diabilities. I will be featuring this at somedaycrafts.blogspot.com
Thank you! I'll be sure to let you know when I do the post and will most certainly link to your blog. : )
Thank you! I too am an autism mom and my son has major sensory issues. He's understimulated most of the time and loves deep pressure. I can't wait to make one for him!! And I'll share it on 30days too. Thanks!
Bless you for sharing this! My son is now 19 but I will make a blanket that will go around his shoulders almost like a shawl using your method.
This sounds amazing!! I wish you could post pictures with your instructions..it would make is so much more clear.
thank you for posting this tutorial. i have 2 autistic children that would benefit from these blankets! you are an angel!
How many bags / ounces of pellets are required?
Thank you for all the detail.
Hi Gypsy – the pellets I purchased at the link provided said that a lbs of pellets was approximately 3 cups worth of pellets.
The weight of the blanket should be based off the weight of the person using it. The full blanket weight should be approximately 10% of the person's body weight plus one lb.
For this blanket, I used approximately 3/4 tsp of pellets in each pocket. Which will make a 6 lb blanket. You can adjust up or down as necessary. (however please email me if you need to add more weight and I will explain how to improve the pattern – [email protected])
To answer more simply: you purchase the pellets by the lb (at the link provided) according to the weight of the person the blanket will be used for!
Oh, I am so long winded!
Ack! Notice how well I answer in my long-windedness!
If you stick with all the other directions (size, weight, etc) of this specific blanket, 4 lbs of pellets should be enough.
Great Tutorial!! I'm so happy to have found this – I was thinking along the same lines, but LOVE the idea of using a cheaper inner fabric to make the pockets for the weights. Off to start sewing!
My son has a weighted blanket and it is sometimes his best friend. Shoot! I want one of my own. They are so calming!!!
A million thank yous for this. I have restless leg syndrome and am going to start sewing this Labour Day weekend. I also have a friend who has an autistic son who might be interested in this as well.
Blessings,
Naomi
Love this blanket tutorial and have bookmarked it. But I was wondering how much sewing skills would someone who is crafty and a maker but a somewhat novice in sewing. I want to make my own blanket and this pattern is a great start but a level of proficiency needed would be helpful. Thanks!
Thank you for the auspicious writeup. It in truth was a leisure account it.
Look complex to more brought agreeable from you! By the way, how could we communicate?
Many niche European brands have chosen a Chic Outlet Shopping(R) Village for
their only outlet boutique in Europe including Anya Hindmarch, Smythson, Cath Kidston,
Temperley London, N. It can sometimes be difficult to judge
the quality of a cheap pushchair at the first glance and one needs
to take a closer and more detailed look at the product in order to figure out
whether it is going to last a lifetime like it should, or if it is going to collapse under the weight of your child
and all the shopping bags stuffed in the basket underneath.
One of the most important decisions that you will make is whether
to look at prams or pushchairs.
Yes! Finally someone writes about ugly belly.
Great post however , I was wondering if you could write a
litte more on this subject? I’d be very thankful if you could elaborate a
little bit further. Cheers!
My brother recommended I might like this website. He was entirely right.
This post truly made my day.You cann’t imagine just how much
time I had spent for this information! Thanks!
Hi there to every one, because I am really eager of reading this blog’s post to be updated on a regular basis.
It carries fastidious material.
Hi everyone. I have made several weighted blankets. What I found that works for me is to make the pockets out of muslin. I found poly pellets to be about $10 per pound! That is why these blankets are so expensive. So I went to an aquarium store and bought gravel that was the next to the smallest size. I washed and rinsed them real well and used them. Inexpensive-about $3.99 for about 5 pounds. It worked great! My daughter says the kids at school love them. I made lap blankets 12″ by 30 ” for them. I marked the muslin with markers that the color eventually disappears. I marked the lines up and down and left to right. I made one 5 pounds. So for every pocket u have u must divide the pounds by the amount of pounds U are using so you know exactly how much goes in each pocket. So if you have 5 pounds to use and you have 30 pockets you divide5 by 30 to get the amount you need for each pocket. Sew all of your lines from top to bottom. Leave the top open. Then measure the amount that you need for one pocket and add it to the spaces you made by sewing the lines top to bottom. When each column has the right amount in the bottom be sure the pellets are all at the bottom and sew across from left to right to close the pockets. Then fill another row and sew left to right until the blanket is full. Then add the front and back to the blanket. It may sound complicated but it is very easy. Just keep the pellets away from the sewing needle. This can be used for any size blanket. Email me if you have any questions. Thanks!!
Oh by the way each blanket cost me about $3.00. All of the material was on sale. One more hint. My brother knows a gentleman that works at a plastic place. He asked the guy for100 pounds of poly pellets. Ck this out!! I got them for free!! You may want to ask someone and tell them what you are making. I told them that the school could not afford the blankets and they were FREE!! Try it!!
I’m autistic, (mild Asperger’s) and I always noticed that I needed either a comforter or many, many blankets to sleep well at night, even in summer. I never realized other autistic people needed that too, since my sensory issues aren’t super bad I rarely think about them. (I guess it makes sense, since autistic people tend to prefer firm pressure than light brushes.)
I make these on a regular basis and I am stumped on using or not using batting.. I would like to know how do your pellets stay quiet in each pocket?
Shelley,
The pocket size is what keeps the pellets quiet. They have just enough room to dry when the blanket is washed, but not enough to cause noise when the blanket moves.