Her: If you felt the need to make your favorite still gestating niece a hooded towel she would use it often and I am sure your blog readers would love to learn how to make them.
Pins
Macy had a piano recital on Saturday. She did great with the first piece. She lost her focus a little on the second one. She said the piano was loud and sounded “different”. Guess that’s what happens when the piano you usually practice on is 85+ years old.
This is seriously THE EASIEST apron ever. There are similar tutorials out there, but here’s how I make them!
Supplies:
1 package extra wide double fold bias tape and thread that matches the bias tape
1 piece of fabric cut approximately 17″ W by 26″ L, edges hemmed
- or -
you can be super lazy (like me) and use a dish towel
template for the pieces you’ll cut off, which can be printed here.
See how cute that dish towel is? The 2 pack was $3! And I think I’ll save the polka dot terry cloth one for one of these.
Cut out your template. Place it on both top corners of the towel. I traced it. You could pin it. Whatever’s easiest.
Next, open your bias tape. Find the middle. Measure 7.5″ on either side and mark with pins. The pins should be 15″ apart. 7.5″ was a good measurement for 8-11 year old girls. Make it shorter for younger girls or longer for adults.
See how one side of the bias tap sticks out farther than the other side? The short side will be on top for the rest of this tutorial.
Line your pins up with the top finished edge of the towel on both sides.
Pin the bias tape in place along the curves.
If you haven’t already seen this tutorial, you really should check it out. I bought the stamps from Harbor Freight a while back and finally got around to attempting this.
(Tangent: The first set I bought — on sale, under $4 — had no M’s and 2 P’s. And they were sold out everywhere in the Greater Salt Lake area. Darn Mormons. They finally got more in and I exchanged them. The N and S and a few other letters got flattened and were not useable by the time we finished our project. Worth $4? Yes, but if you’re doing this project with a large group you may want to buy more than one set or find better stamps.)
Macy’s class is having a “class store” to help them use the money counting skills they’ve been practicing in math. She and a friend decided that instead of, you know, selling Dum Dums or something that they wanted to make pillows. Thankfully they got over that and decided to make washer necklaces instead. The girls and us moms spent yesterday afternoon mass producing on behalf of M&M Washer World. The pay wasn’t great, but the memories were priceless. :o)
I know you brought a vacuum with you. I saw you carry it upstairs. Was it just for looks? Because the entire floor in my laundry room is COVERED with insulation.
Thanks,
Char
It’s been a weird, weird “summer”….cold and rainy, mostly. Just turned the AC on for the first time earlier this week. But yesterday??? Yesterday was gorgeous!
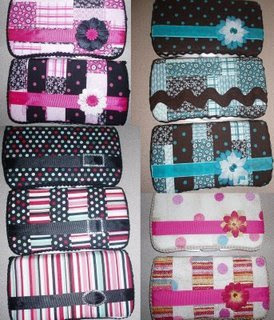
You’ve seen these cute boutique wipes cases, right? My friend and neighbor Tam has a great tutorial for them. I haven’t tried it yet, but she swears it’s easy. And there’s no sewing involved!
Which is exactly why we’re making them for our next neighborhood sewing group project! July 1st…details to be announced.

I swear my apron tutorial is coming. I need to make a quick trip to the fabric store first, which is super fun with 4 kids in tow. Try it some time. I dare you. I’ll even let you borrow my kids.
I’ve got another tute half done, too.
Soon. Very soon.
Macy’s orchestra concert was today. Don’t worry…I’m not posting the whole thing. Here’s less than a minute of her solo.
There’s a bake sale tonight at church. I decided to give the rainbow cupcakes another shot. Turns out if you follow the directions exactly and don’t have 13 tween girls helping you, they turn out awesome. I use this recipe from Pampered Chef for frosting, only I add a pinch or two of salt. The other cupcakes are chocolate with peanut butter frosting. I doctored a cake mix a la Amber: an extra egg, a box of pudding, and about 1/3 c of sour cream. The frosting is this one, but I followed the directions in the first review and (again) added a little salt. Maybe I’ll stop posting about cupcakes now?
Macy’s class did a musical today. She was one of the 3 pigs. She told me she got stage fright yesterday and wouldn’t sing in front of her teacher. Really the whole thing will only be entertaining to family, so skip to about 1:50 and see why I was surprised.


Copyright Crap I've Made© 2026 | Web Hosting By RFE Hosting