Guest Post: Neighbor Jami & Her Nursery Furniture

Neighbor Jami is back today telling us about the paint technique she used on her nursery furniture!

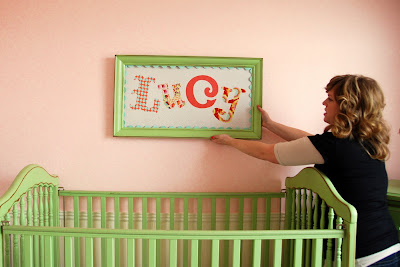
As far as Lucy’s furniture went, I had none…at least none I wanted to use. My existing crib was way too bulky and masculine for a dainty little girl’s room, and I had given all my other baby stuff away.


So I put the word out via Facebook that I was in need of a crib and would be willing to take one off someone’s hands if they were needing to get rid of one. Within 2 hours I had landed one from my pal Mindy.

Next, I bought a solid wood dresser at the Bountiful DI for $25.00. Have I mentioned I love the DI? I do.

DSCN6479 (The knobs are new, from Hobby Lobby)

I painted these both using a spray paint by Valspar in “Pistachio”. After a few coats and letting them completely dry I sanded the edges and then rubbed “Distress Ink” in the color of “vintage photo” on the sanded areas. (Distress Ink is basically a rubber stamp pad you can find at any craft store.) I then finished by spray painting a clear coat in a satin finish.

DSCN6481

My Rocking chair:

DSCN6480
My camera stinks so you can’t fully appreciate the color. It is called, “Crystal Aqua” by Valspar. A cushion is in the process as we speak. I also lightly sanded the edges and glazed the edges the same way as mentioned before.
My cute and talented neighbor and friend Decorator Wendy gave me these cute little boxes she purchased from Pottery Barn, to use next to my changing table. James painted these using the same “Aqua-Crystal” paint by Valspar that was used on the rocking chair. Then I cut out these labels in white vinyl using my silhouette.

DSCN6488

DSCN6487
-Jami

Hopefully the next installment will feature Char actually having sewed some bedding. If not, we might have to break up!
-Char


And, one more thing.  Apparently Valspar has changed the name of the spray paint color in question.  It is not longer called “Pistachio”.  It’s something like “Leaf Green”, but the paint guys assured Jami it’s the exact same color.  I’ll updated with the official name after my next trip to Lowe’s!

Please follow and like us:

Giveaway: GroopDealz gives you $50 to Target

How was your weekend?  Create anything fabulous?  I finished Neighbor Jami’s crib bumpers on Friday.  I need to sneak over there and get some pictures to share.
I spent most of the rest of mine trying to locate something to wear to Creative Estates that hides my heffer-ness.  Perhaps the cuteness of the shoes I purchased will help?
I’m also trying to kick a cold that will not die.  NyQuil and I are good friends these days.  So good, in fact, that after I got the kids off to school I got back in bed and slept until 10:30.  Oops.
So, to get the week started right (after noon…ha!), I’ve got a little something for you, courtesy of the nice folks over at GroopDealz:
target gift card
a $50 Target gift card!
Are you familiar with GroopDealz?
logo-black
Let me give you a quick rundown.  GroopDealz features fabulous handmade products, 1 or 2 at a time, for a short period of time at a HUGE discount.  Right now they’re offering these insanely cute Easter hair clips:
deal_157
$7, $2.50 shipping
And a hilarious take on a “No Soliciting” sign:
deal_158
$4, shipping included
The deal changes every couple of days, so you’ll want to be in the loop.  There are 2 ways to do that:
Follow GroopDealz on Facebook (1 entry)
and
Sign up for notifications on the GroopDealz site (1 entry)
Leave me a separate comment for each one.  Giveaway closes Saturday morning when I roll out of bed.
Ready?  Go!
Please follow and like us:

Winner: How to Slipcover DVD

The winner of the How to Slipcover DVD from Shelley is…

slipcoverwin

#156, aka Cynthia, who said:

Hi! I’ve just posted a picture of the blue faded couch that is in need of some serious pampering!!

It was her bonus Facebook entry of this couch that got her the DVD:

scwin

Congratulations, Cynthia!  Shoot me an email to [email protected] to claim your prize!


Please follow and like us:

My Peeps Shirt

DSC_0040-1

I wanted to try Silhouette’s sewable interfacing, too, so I could give you my thoughts on it.

I decided on a quick shirt for Campbell, since I’m positive he’ll continue his streak of demanding mom-made holiday wear.

The chick shapes came from the Silhouette online store.  The font is Aharoni.

DSC_0049

The sewable interfacing definitely doesn’t cut as cleanly as the clean cut, BUT there still were not a whole lot of places where I had to trim strings…maybe 2 or 3?  And, honestly, even if I’d had to re-cut every single line with scissors it still would be faster than tracing and cutting manually.  Especially when I forget to mirror image stuff on the back when I’m doing it the old fashioned way and have to cut it more than once.

It was a good thickness for sewing and held stuff in place nicely.

So yeah.  I liked it.

I sewed the letters all messy (on purpose, with my free motion foot).  I’m not sure how I feel about them.

DSC_0051-1

The March Silhouette promotion runs through Sunday.  Use code “CRAP” to get a machine, both kinds of interfacing, and a roll of white flocked heat transfer for $229.  Code “CRAP” will also get you 25% off the interfacing.


Please follow and like us:

Oops. Let’s Hear It For The Boys!

So, uh, that last post?  The one about the paint colors in the Utah Jazz mural?  I thought I’d saved that as a draft, not published it.  I was doing some de-junking and wanted to throw out the paint chips.  Instead of writing them down and creating another piece of clutter, I saved a draft.  Or published them for all the world to see.  Whatever.

Now what I really meant to post about today:

The super super super nice and super super super cute Cheri over at I Am Momma Hear Me Roar is having a contest (with prizes!) for boys shirts/jackets/vests/tops.  Have you made one recently (as in, since February 28th)?  Have you embellished one lately (as in, since February 28th)?

GO HERE TO LINK UP!

And the judges?  They’re FABULOUS.  Winking smile


Please follow and like us:

Utah Jazz Mural Paint Colors


Wall color: LA1001 Pale Apple 1 (It looks SUPER weird to me on the Valspar site.)
Navy: LA1412 Navy 6
Green: LA1116 Paris Green
Gold: A16-5 Naple’s Gold (from Olympic, but we had them color match it in the Valspar paint)

Please follow and like us:

Guest Post: Meet Neighbor Jami & Her Nursery Walls

This is my insane(ly awesome) neighbor Jami, aka the person I’m most likely to get arrested with:

I’ve gotten A LOT of emails about her nursery since posting the name art.

You’re in luck, because she’s agreed to do a couple of posts to share the details with us! So, here’s Neighbor Jami!
Well, as some of you are already fully aware (and those who aren’t, surprise!!!) I am expecting! After having 3 boys and vowing to my husband, myself, and family and friends that I would NEVER be having more children. I gave in and am happy to be carrying the first, last and only daughter I will ever know!!! You can imagine my joy on finding out I was having a girl! Immediately I thought of all the wonderful things that will accompany having a girl: the shopping that will be taking place, money spent, hair bows, shoes, leggings, jewelry, dresses, lace, dolls, everything pink, just to name a few… and of course, let’s not forget the NURSERY!

Ahhh the blessed nursery. Within 2 days of finding out it was indeed a girl, my mind already conjured up brilliant plans for baby Lucy’s nursery. It has become quite the undertaking, but I must admit I love it! And of course I would never be able to produce my desired outcome without some major help from my talented friends and loved ones.

First, my amazing (and dead sexy) husband, James. He is my go to guy. I find I start a “simple” project that ends up being way more work than I had anticipated and then he lovingly steps in and finishes it for me. He is also amazing at building things I think of, that don’t exist, and “jimmy-rigging” thrift store finds so they are workable again. Besides all of these amazing things…he is a great husband and dad. I love him.

31My husband, James (told ya he was dead-sexy)

Next, my pal, Char. Oh where would I be without this girl in my life? For how many times I call her for advice, opinions, directions, instructions, and to borrow just about everything, including her amazing input on craft ideas, I feel like I should be paying her a monthly fee! She has become my crafting comrade. Not only is she talented in all crafting areas, but she also provides some great comic relief to any scenario. We have had our fair share of fun crafting adventures, and fun “non-crafting” adventures. (Like the time we packed my van full of 6 boys all under the age of 6 so that I could double check a faulty pregnancy test with my doctor. But, hey…that is another story for another time).

She has been kind enough to help me out with Lucy’s nursery by helping me with some decor and also by taking on the huge project of sewing all her bedding and window dressings. I can’t wait to see them all finished and adorning Lucy’s room. It will be great!

Char and me, I feel, make a pretty good team. I feel confident enough to say that I can conjure up some pretty crafty ideas, but then to back it with brains… I am pretty much screwed.

Enter, Char.

The woman can figure anything out. Half the time she is explaining things to me I just have to nod my head and pretend to understand what she is saying just so I don’t look like a complete fool. What can I say? I am blonde, and I am a hairdresser, not a brilliant person like, Char. (no offense to hairdressers) we have our place in this world too. After all, we make people pretty! Can you imagine what an ugly place this world would be without us?

Okay, moving on…

I decided to use Jett’s old room for the nursery, because it already had bead board hanging on the lower half of the walls. I chose to re-paint the bead board using paint by Valspar called, “Craft-White”. Next, I rubbed a glaze in the creases to accent them using a tintable glaze by, Valspar. I cannot remember the color of paint I used to tint the glaze. I bought a light tan in a sample can that you can get for around $3.00 at Lowe’s.

DSC_0962-2You can kind of see the bead board in this picture

Next came the upper half of the walls. I originally wanted this wallpaper by Amy Butler, since I love everything Amy Butler (I’d probably lick her toe jam, I love her so much) but then realized this was not going to be very practical considering the price! I’ll let you research that yourself, I don’t want to have you pass out in the middle of my post!

Bummed about the wallpaper, I called, Char and she mentioned these cool stencils. I liked the damask one myself, and I almost bought it even though it was a bit more than I’d like to spend. Then, on an outing to Hobby Lobby, I came across some wall stencils there and found a worthy comparison for only $16.99!!! I could handle that! So, I bought it. We primed and painted the upper wall using, “Baby Blush” by Valspar and then began stenciling, once the pink had dried.

For the stenciling, I wanted it very subtle, because it was a “busy” design. So I took the left over pink (1/4 gallon, give or take a few) and added the left over, “Craft-White” paint (1/2 gallon, give or take a few) to lighten it up. Next we followed the directions on the stencil and painted away. Over all the stenciling wasn’t too hard to do, just some prep work, and a lot of time, but fairly easy.

The stenciled wall. Remember, it is subtle, so look closely.

And here’s a digitally enhanced version of the same pic. The color is not that crazy in real life, I just wanted you to see the detail.

DSC_0852

That’s it for the walls. Next up? Refinishing the furniture!

-Jami

Please follow and like us:

Office Door Makeover

***Don’t forget to enter to win Shelley’s awesome How to Slipcover DVD here!***

BC’s office is the only one in the building that has a window in the door.  Nice, right?  Not so much when EVERYONE in the place has to pass his office on their way to the bathroom.  And they all like to peek in.  I have it on good authority that he occasionally falls asleep at work, so he asked me to come up with some sort of window covering solution.  Here’s what we came up with:

DSC_0034-3

First, we “frosted” the glass on the inside of his office door using clear contact paper and Windex.  There are a bunch of instructions floating around out there, so no tutorial on that, but the gist of it is that you spray both the window and the contact paper with Windex and then you smooth out the bubbles with a credit card and trim the edges with a razor blade.

The main limitation of this technique is that you can only “frost” stuff narrower than your contact paper.  We had to make a seam.  You can see it in this picture:

DSC_0031-3

We put his name directly over the seam to camouflage that a bit.

Next, I imported the company logo into my Silhouette software and used the trace function.  I found a copycat font and retyped the smaller lettering, because it did NOT trace well.

I used Silhouette premium vinyl and applied the logo on the outside of the glass.

DSC_0035-3

And now he can sleep in peace!


MARCH SILHOUETTE PROMOTION:

Silhouette SD, one of each fabric interfacing (clean cut & sewable) and a roll of white flocked heat transfer material for $229.

If you already have a Silhouette and want to try out the interfacing, you can get 25% off.

The March promotion will run from the 21st through the 27th.

Code “CRAP” will let you take advantage of either of the deals.

Please follow and like us:

Giveaway: How to Slipcover DVD

Once upon a time, when I had my 4th kid, I decided that I had some insane sewing skillz and that I was going to slipcover a chair for the nursery I bought a Jennylund chair from IKEA and a plain white slipcover ($29) to rip apart and use for pattern purposes. Then I spent approximately 5 hours carefully seam rippering (totally a word) the sucker apart and taking copious amounts of notes and pictures as I went so I could get it all back together correctly.

Disaster in the making? Eh…it actually turned out pretty great, probably because my mom was helping and talking me down from the crazy.

jennylund slipcover

But when I posted about it, I said I probably wouldn’t do it again. And I didn’t. IKEA did. See?

DSC_0746-2

What’s my point?

I suspect the experience wouldn’t have been nearly as traumatizing if I were Shelley.

scheader

Or even if I was still just me but I had put my cash towards her DVD instead of a slipcover to rip up and Happy Meals for the kids because I spent 5 hours with a seam ripper instead of cooking dinner for them.

scdvdbig

Let’s take a look at some of Shelley’s awesomeness, shall we?

BEFORE:

sc3

AFTER:

sc4

BEFORE:

sc5

AFTER:

sc6

BEFORE:

sc7

AFTER:

sc8

BEFORE:

sc9

AFTER:

sc10

Have you got some ugly furniture that needs covering?

Great news, because Shelley is giving one lucky Crap I’ve Made reader a copy of her How to Slipcover DVD!

We’re going to keep this simple…

TO ENTER:

Leave a comment ON THIS POST (not on Facebook or in response to your email subscription) telling me which piece of furniture in your house needs a slipcover makeover the worst!

ADDITIONAL ENTRY:

Post a picture of said piece of furniture on the Crap I’ve Made Facebook page. Come back and leave an additional comment on this post saying that you did. I want to see just how badly you need this DVD! Winking smile

Giveaway will run until whenever I get up on Saturday morning.

Shelley is also giving away a copy of the DVD. Check out this post on her blog for details on that.

Please follow and like us:

Name Art + March Silhouette Promo

name art

You’ve heard me talk about my insane neighbor Jami before, right? Hint: The Smelly Barn Adventure™. After 3 boys, Jami’s expecting her first girl, and I’m lucky enough to be sewing the bedding and helping her execute the awesome ideas she comes up with. (We joke that we’re going to buy land with a barn in the country and have sleep over craft retreats. She’ll come up with the ideas because she’s WAY more creative than me and I’ll figure out how to make them happen.)

Do you see that freaking amazing wall treatment? We’ll talk about that in a few days. After I posted the preview of this project on Facebook, I received several emails asking about how she painted the furniture. We’ll talk about that, too. Be patient. Today’s just the name art. Winking smile

Jami picked up a framed picture at the DI (thrift store) for a couple of dollars. She picked it based on the fact that the shape was good for spelling out a name. We pried the print out of the frame using butter knives and then flipped it over so that you couldn’t see the print through our white on white backing fabric. If your frame doesn’t have a print in it, you could cut some foam core or cardboard and accomplish the same thing. We applied the fabric to the print using spray adhesive.

DSC_0914-1

We figured out what size we wanted our letters and cut a test run with the Silhouette on notebook paper. You could ABSOLUTELY do this project without a Silhouette, you’d just have to cut the letters by hand. And unless you named your kids something long (like Charlotte…thanks mom), it won’t take long.

DSC_0917-1

Because I know people will ask, the fonts are:

L – Big Top
U – Mixed Up, it’s the capital U
C – Oliver
Y – BoyzRGross

Once we were happy with the size, we got out Silhouette’s new fabric interfacing. We used the clean cut (stronger adhesive, not machine sew-able) because this project isn’t going to need to be washed or handled and we wanted the stronger adhesive.

We applied it following the package directions and got cutting.

DSC_0919-2

We had the Silhouette double cut the letters, just to be safe. Look how nicely it cut!

DSC_0921-2

After we had all the letters cut, we positioned them on the backing fabric

DSC_0923-2

and ironed them in place.

DSC_0925-2

Then we folded the edges of the backing fabric around to the back and secured them in place (more spray adhesive).

DSC_0933-2

Jami hot glued some jumbo ric rac along the groove in the frame.

DSC_0947-2

And…

DSC_0955-2

DSC_0962-2

Then she called me back to say she’d hung it, so I went back for a couple more pictures.

DSC_0991

name art
(Thanks to our other fabulous neighbor, Decorator Wendy, this is where it’ll stay.)

MARCH SILHOUETTE PROMOTION:

Silhouette SD, one of each fabric interfacing (clean cut & sewable) and a roll of white flocked heat transfer material for $229.

If you already have a Silhouette and want to try out the interfacing, you can get 25% off.

The March promotion will run from the 21st through the 27th.

Code “CRAP” will let you take advantage of either of the deals.


Please follow and like us:

Creative Commons License
Crap I've Made by Char is licensed under a Creative Commons Attribution-Noncommercial-Share Alike 3.0 United States License.
Based on a work at www.crapivemade.blogspot.com.
Permissions beyond the scope of this license may be available at www.crapivemade.blogspot.com.

MyFreeCopyright.com Registered & Protected
BLOG DESIGN BY: